V Anvil Micrometer: Definition, Working, Uses, Least Count, Advantages & Disadvantages
What is V-Anvil Micrometer?
V Anvil Micrometer: Definition, Working, Uses, Least Count, Advantages & Disadvantages :- V – Anvil micrometers can be defined as a device which is used for measuring large objects because measuring large objects are expensive for some micrometers but V – Anvil micrometers are very cost effective. For variety of length, V – Anvil micrometers gives use interchangeable anvils, therefore several of dimensions measurement can be taken from the single frame. ( Types of Micrometer )
General Description of V-Anvil Micrometer
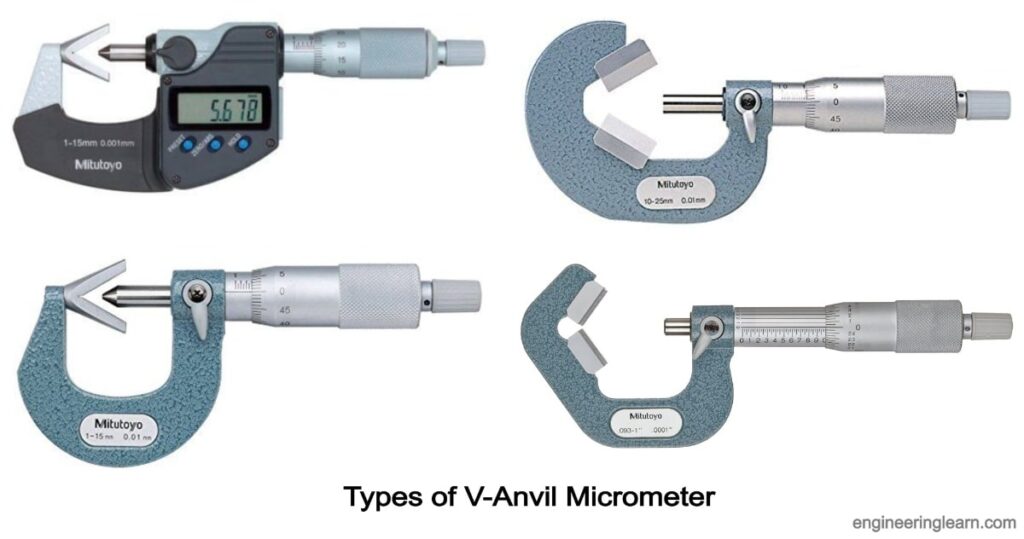
The overall structure of a V – Anvil micrometer is the same as that of a standard micrometer. The essential parts of V – Anvil micrometer includes anvil, ratchet, spindle, knurled gripe, C frame, thimble, lock nut and sleeve. The shape of anvil sets the V – anvil apart because it is in shape of letter ‘V’ which is lying on its side. The V provided in V anvil come close together tips as well as in widely distanced tips and the point at which V lines are touching are fused or there have small gap. The structure of the end of spindle can be conical or it may be flat in which there are varying degree of point at tip.
These minor adjustments in the design of V – anvil micrometer results in high accuracy. In some V- anvil micrometers there are ratchet stop are provided for applying more constant force and they are made with centerline groove which can results in specialized measurement. The V – anvil micrometers are come in vernier as well as digital styles.
The digital V – anvil micrometer provides us precise zero setting and they even hold data for the ongoing measurements, there is a two point pre – set for high efficient use, a function lock is provided for locking the position in place, output data are clearer and they have conversion capabilities in between millimeters and inches.
Working of V-Anvil Micrometer
V – anvil micrometers are available without or with centerline groove. When centerline groove are provided then they are very useful for taking measurement of tap’s pitch diameter in which three or five flutes are provided. The point at which both the sides of V meet, zero reading of V – anvil micrometer starts. Generally the V- anvil micrometer come with the pre equipment of the cylindrical zero set check.
On the analog models of V – anvil micrometer, graduation is 0.000024 inch or 0.00005 inch and 0.01 mm, 0.001 mm or 0.0001 mm and flatness of spindle.
On the digital models, the flatness of the anvil and spindle is 0.000012 inch or 0.00004, the battery life of the micrometer are expected to last 1 year to 2 year in case of normal usage. Digital models have the resolution of 0.001 mm or 0.00005 inch. Therefore on the basis of the function the digital V – anvil micrometer have data hold function, zero setting, 2 – point pre – set, data output and the conversion capabilities.
Uses of V-Anvil Micrometer
V – anvil micrometers are used for measuring cutting tool’s outside diameter in which there are three or five flutes.
Measurement of outside diameter of the cutting tools:
V- anvil micrometer are useful when the measurement should be done for outside diameter of the cutting tool in which there are odd numbers of flutes. By simply laying the cutting tool on its side orthogonally with the V – anvil micrometer anvil, the lanes of flutes are aligned with anvil surface of the V – anvil micrometer and the ratchet are spined for adjusting the spindle at the place.
These micrometer are well suited for the measurement of cutting tools like reamer, taps and end mills as well as they can easily measure the pitch diameter of tap which have smaller diameter. These functions are performed with the help of single wire method.
- V – anvil micrometers in which centerline groove are there are used for the measurement of pitch diameter of taps with the help of single wire method.
- V- anvil micrometers are also useful in checking the roundness.
Checking for roundness:
Checking for roundness is also called checking for out of roundness. Before checking for roundness several measurements are taken at various locations around outside the shaft or cylinder. Then the smaller diameter is subtracted from the largest measured diameter after that the resulting number are divided by two. The result represents amount of out of roundness which is exhibited by the part. Checking of roundness become easy with the v – anvil micrometer because anvil’s v – shaped location of the sides are well positioned for placing the part horizontally and the contact points are around the edges.
Advantages
- V – anvil micrometers have high precision in measurement specially in case of diameter measurement because the diameter measurement are done by making contact at three points in each side of the spindle and anvil.
- V – anvil micrometers are used for taking high precision measurement in case of cutting tools which have odd number of flutes.
- They are very cost effective when large range of measurements should be taken.
- V – anvil micrometers have interchangeable anvils which is of different lengths therefore various dimensions are measured by using a particular frame.
Disadvantages
- They are very expensive.
Image Source :- mitutoyo
