Outside Micrometer: Definition, Parts, Diagram, Least Count, Uses, Accuracy Test, Advantages & Disadvantages
What is Outside Micrometer?
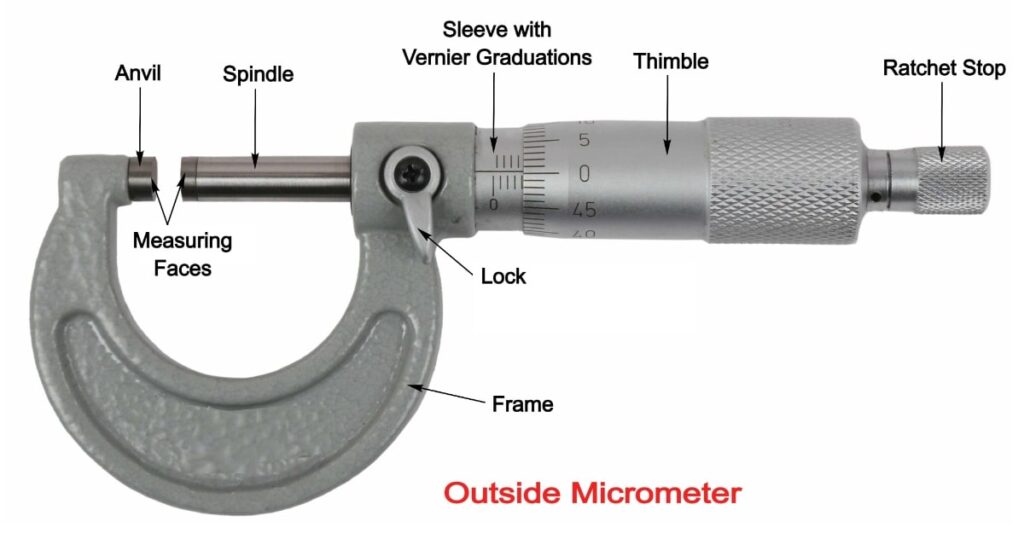
Outside Micrometer: Definition, Parts, Diagram, Least Count, Uses, Accuracy Test, Advantages & Disadvantages :- Outside micrometer is also known as external micrometer or side micrometer. Outside micrometer are used for measuring dimensions of small components with great accuracy. Outside micrometer are made in different patterns so that it suit for various applications and they gives us direct reading.
Parts of Outside Micrometer
Basic parts of outside micrometer instead of size or type of micrometer:
1. Spindle and Anvil
The anvil in micrometer re removed for minimum 3 mm from frame for allowing measuring wire support attachment. Anvil diameter is equal to the spindle diameter and their axis is in exact alignment. Spindle can be defined as movable measuring face. A spindle locknut is provided for keeping the spindle in its correct alignment. The screw as well as the spindle is lubricated with light, thin, non corrosive oil so that no backlash between nut and the spindle screw occur and spindle can run smoothly and freely to the length of travel.
2. Frame
The outside micrometer have U – shaped frame which enable the measurement of cylinder. If the diameter is in measuring range of the outside micrometer and shiftiness must be that 1 kg weight test load do not differ the distance more than 1.5 μm for which the range is 0 to 25 mm or it may be 2 μm for the range of 25 mm to 50 mm.
3. Adjusting Nut
Adjusting nuts are provided in micrometer foe compensating the wear between the nut and screw portion of spindle. The adjustment is provided with the help of spanners and keys provided with the micrometer.
4. Ratchet Driver
Ratchet driver are used for assuring the correct measurement and they are fixed at the thimble end. They restrict the application of pressure to micrometer. It helps in maintaining the constant pressure for measuring. Force acting in the measuring faces should be in between 0.5 kg to 1 kg and the torsional moment are also so equipped to provide this much force.
5. Thimble and Barrel
Around the circumference of the thimble there are 50 equal divisions and the value of each division are 0. 01 mm. the barrel are correctly divided and have clear mark of 0.5 mm divisions and they are adjusted for zero setting and chrome plated.
All the lines of graduations in the barrel are clearly engraved for easy reading. The finish of barrel and thimble are dull but graduations are blackened.
Reading of Outside Micrometer
Cylindrical Parts
- Contact surfaces of cylindrical part and micrometer are cleaned.
- Micrometer is opened slightly larger than cylindrical part.
- Anvil is seated squarely on the surface of the cylindrical part.
- By moving back and forth around the diameter of the cylindrical part, micrometer is closed slowly.
- While closing the micrometer, first contact is felt then rock sideways for finding the position over centre.
- Steps are repeated for 4 to 5 times till the perpendicular position are found.
Flat Parts
- Contact surfaces of flat part and micrometer are cleaned.
- Micrometer is opened slightly larger than flat part.
- Anvil is seated squarely on the surface of the flat part.
- With the use of ratchet, micrometer is closed slowly until ratchet clicks.
- Reading is recorded.
- Entire procedure is repeated for few times and then average readings are calculated.
Factors Affecting the Outside Micrometer
- The size of the micrometer should be such that it is not so heavy and requirement of the support is less therefore the size of the part are concerned.
- It should be closely related with the position from where it is being measured, because if a 25 mm micrometer is being used from arm’s length from recess of large machine then it provide uneasy to the user.
- Surface finish is also considered because if the finish is coarser then it will provide prominent feel in comparison to the fine finish.
Accuracy Test of Outside Micrometer
Accuracy test of micrometer are done for assuring that the results provided are in the correct size required. It is necessary to set the instrument to zero before it is used for measuring the size of the component.
Steps followed for testing the accuracy of the micrometer are:
- First of all measuring face is cleaned and then thimble is turned until the ratchet slips and two anvils are touching.
- At this setting the reading are done which must be zero that means that thimble are coincide with barrel’s zero reading. The zero mark on thimble and zero reading of the barrel should be coinciding with barrel datum marking. When the reading was not zero then adjusting spanner is used for allowing micrometer to set to zero.
Advantages of Outside Micrometer
- They are more accurate than rules.
- No parallax error.
- They have wear adjustment.
Disadvantages of Outside Micrometer
- Range of measuring is short.
- They can take only end measurements.
- They are used for only single purposes.

