Autocollimator: Definition, Types, Uses, Working Principle, Applications, Advantages & Disadvantages
What is Autocollimator?
Autocollimator: Definition, Types, Uses, Working Principle, Applications, Advantages & Disadvantages :- An autocollimator is device which is based on optics and used to measure small angular variations. This device is extremely sensitive to very small angle changes and can accurately measure angular deviations. It’s essentially a combination of collimator and an infinity telescope. The autocollimators are basically used to align the different components of a system together and measure their mechanical or optical deflections.
Working Principle of Autocollimator
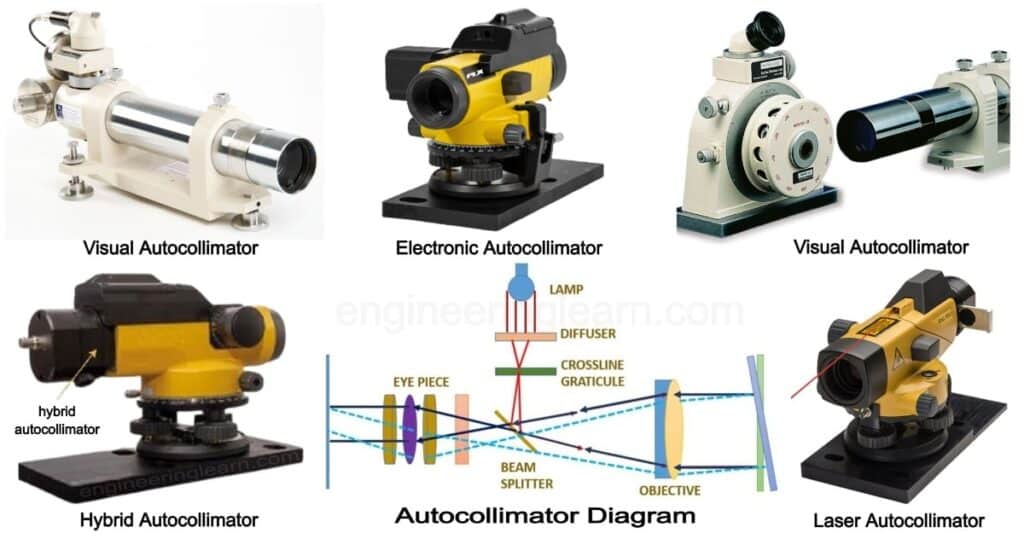
When a monochromatic light source’s beam of light rays is made to fall on a beam deflector, it deflects the beam into 90 degree towards the converging lens. The converging lens made the beams parallel and throws it to the object or reflecting surface. The beam deflector should be kept near the converging lens’s focus to keep the light beam parallel. The parallel rays are then made to fall on a reflecting surface or an object. The rays reflect back and proceed along the same path, in opposite direction,
if there is no angular deviations on the object’s surface, eventually converge at the receiver kept at the focal distant from the converging lens. If the object is inclined at angle α then the reflected ray makes an angle 2αwith the incident beam.
Working of Autocollimator
The reflecting surface/object surface in an autocollimator is the surface whose inclination is to be measured with this instrument. A micrometer microscope is also used to clearly view and measure the distance between the incident and reflected ray points in the graticule. The light source is initially lighted, and the light rays reach the beam deflector, which then directs the light rays towards the converging lens. The light beams will be parallelized by the converging lens and directed towards the reflector. There are two possibilities now:-
1. The Object Surface is Tilted at Some Angle α
When the reflector is tilted at an angle, the parallel light beams reflect at an angle that is twice the angle of tilt. The light rays are concentrated in the plane of the graticule after reflection, but linearly displaced from the intersection of cross-lines by 2α * (focal length of the converging lens).Depending on whether a visual or digital autocollimator is employed, the linear displacement of the graticule image is measured using a micrometer microscope or an electronic detection system.
2. The object Surface is Normal to the Light Beam
The light rays will be reflected back to their original pathways when parallel light rays reach the reflector and the reflector is normal to the light rays. Some reflected light travels straight through the beam deflector, allowing the return image of the graticule cross-line to be seen through the eyepiece, effectively turning the telescope into a telescope focused at infinity.
Types of Autocollimator
1. Visual Autocollimator
The angle of tilt of the object surface is measured in a visual autocollimator by looking through an eyepiece at a graduated scale. The angular resolution increases as the focal length of the visual autocollimator increases, while the field of view decreases.
2. Digital Autocollimator
The digital autocollimator can be subdivided on the basis of their working principle, which is described below.
i) Electronic Autocollimator
The electronic autocollimator is a high-end high-precision angle measurement device with no optical eyepiece. This device can measure small angular deviations with accuracy up to fractions of an arc-second. Measuring with an electronic autocollimator is quick, simple, and accurate, and it’s usually the most cost-effective method. These highly sensitive devices are widely used in workshops, tool rooms, inspection departments, and quality control laboratories globally use them to compute with utmost precision the small angular displacements, squareness, twist, and parallelism.
ii) Laser Autocollimator
Today, with the advent of new technology permits the autocollimation equipment to be improved such that direct measurements of reflected laser beams can be made. This unique feature allows lenses, mirrors, and lasers to all be aligned at the same time. This technology fusion of a century-old autocollimation technology with recent laser technology results in a very versatile instrument capable of measuring inter-alignment between multiple line of sights, laser in relation to mechanical datum line, alignment of different holes and cavities, measurement of multiple rollers parallelism in rolling industries, laser divergence angle and its spatial stability.
iii) Hybrid Autocollimator
Autocollimator as an optical instrument was invented around a decades ago for precise, non-contact measurements of angle. It has a lengthy history of being utilized in the alignment of angles and optical elements since its invention. Recent advances in photonics have necessitated the alignment and measurement of optics and lasers, which the new hybrid technology addresses. Furthermore, using modern motorized focusing technology adds a new measurement dimension by focusing on the area to be studied and performing alignment and deviations from alignment measurements in microns.
This multi-function-multi-process hybrid optical equipment will be used to measure highly integrated systems both during the assembly process and during final testing and examination. Hybrid technologies have the ability to meet the needs of a variety of technologies, including laser alignment, spatial characterization, and beam profiling of numerous single emitters. This analysis procedure generates angle-dependent spatial resolution patterns of light sources in relation to a mechanical datum plane, which is a good solution for testing VCSEL lasers accurately and quickly.
Application of Autocollimator
- Checking flatness of machine tool beds and slide ways.
- Measuring very small angle with high precision.
- Verifying parallelism
- Checking the column’s squareness in relation to the base.
- Examining the flatness of bed plates and table tops.
- Checking for small linear shifts.
Advantage of Autocollimator
- Very high accuracy.
- Ability to measure wide range angle.
- Easy to set up and operate.
- Calibration at the level of international standards.
- Result can be seen directly on the screen.
Disadvantage of Autocollimator
- Regular maintenance is required
- Measurements require much time.
- For the detector to trace the sample, it has to be cut and processed.
Image Source :- taylor-hobson, dumaoptronics, BEST ENGINEER, electronicspecifier
